Updates
03/02/23 - removed 'none' as a section background color when building a Landing Page and set the default option to 'White'.
02/07/23 - removed Organization and Table of Contents as embeddable elements.
10/17/22 - Changes to Layout Builder to improve user experience for content editors.
09/07/22 - Changes to Layout Builder to improve user experience for content editors.
12/17/20 - Small Title styling added for sections.
...
Anything that will take much more than a quick glance to comprehend, for instance:
- Large blocks of text
Videos
Social media feeds (exception for elected officials)
Anything someone wouldn’t understand if this is the first page they see on your site:
- Insider jargon
Detailed explanations or information
Landing Page Development
Developing a Landing Page is an easy yet multi-step process which entails:
1.) Creating the Landing Page Container,
2.) Layout Selection/Add Content and
3.) Publish Landing Page.
Creating the Landing Page Container
- Log into your agency website.
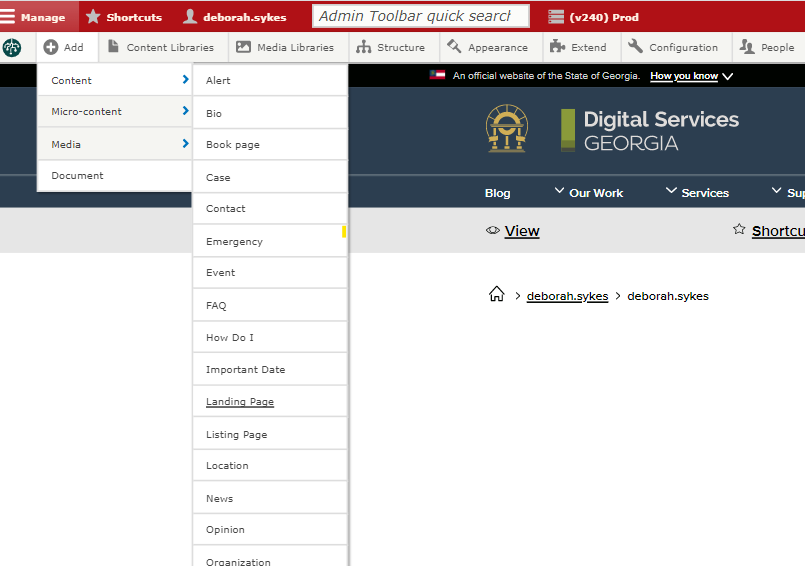
- Click on Add Content.
- Select Landing Page.
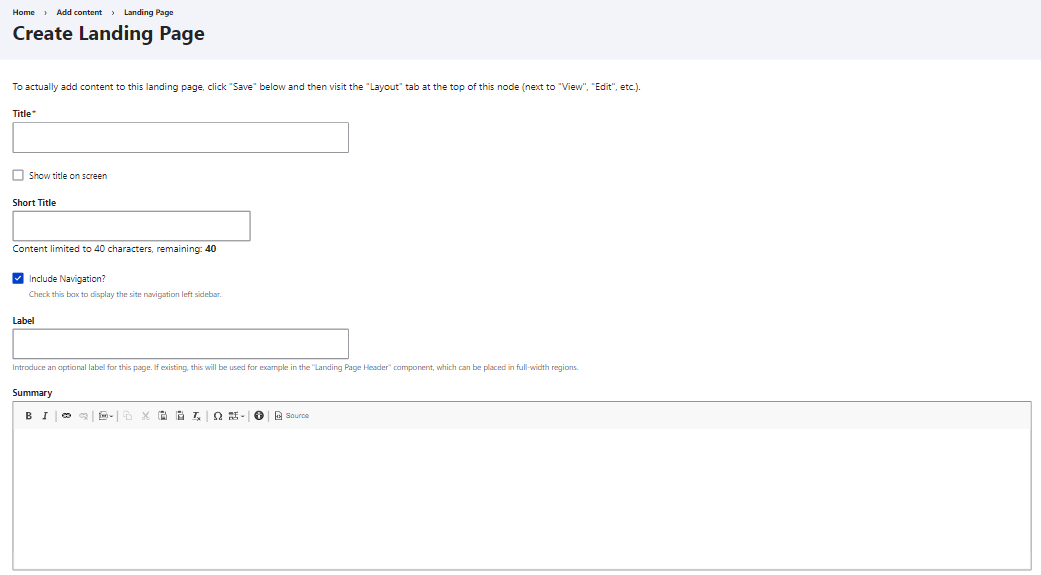
- Add Title (required).
- The Title is required so that the Landing Page can be found in the back-end of the system.
- It will not appear on the Landing Page itself.
- Add Short Title (optional).
- The Short Title will replace the title in URLs, navigation, and anywhere the page is linked to from other content across the site.
- Select the Include Navigation? checkbox if you want the Landing Page to display with the side navigation visible (optional).
- Add a Label (optional).
- This will only display in very specific circumstances and in most cases can be skipped.
- Add Summary (optional).
- Add a short statement to summarize the page’s content or purpose. In most cases, this will not show on the page itself but will be used in any links to the page that are configured to include a description.
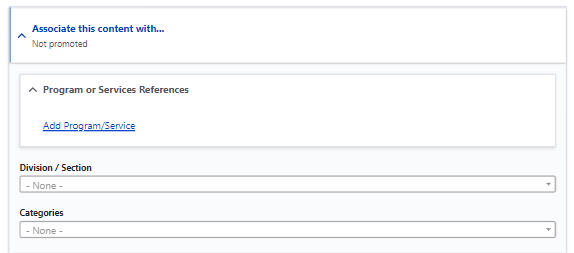
- In the Associate this Content with box…
- Associate the Landing Page by Selecting (optional):
- Program or Service References
- Division / Section
- Categories
- Associate the Landing Page by Selecting (optional):
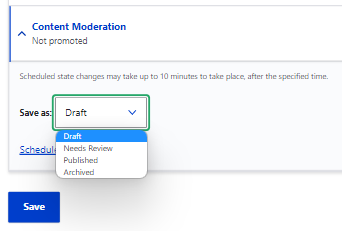
- For the moment, leave the moderation state to Save as: Draft.
- Until you complete the next phase – Adding Layout and Content – the page will appear empty.
- Click Save.
...
Note: Hover over image to see the associated step(s) outlined above.
Adding Layout and Content
GovHub allows you to customize the layout of a Landing Page by stacking Sections of various layouts and or by adding Blocks of content to each section.
When creating a new Landing Page, a default layout section is provided. Because there is no way to change the layout of the section, once created, click the X next to the Configure Section link if you decide not to use it.
- Click + Add Section link in the middle of your screen.
- Select the preferred layout for the section:
- One full-width column
- Two columns, with a 2/3-width region on the left and a 1/3-width region on the right
- Two columns, with a 1/3-width region on the left and a 2/3-width region on the right
- Three equally-sized columns
- A Configure Section box will open up to allow you to do the following:
- Enter a Section title (optional). Note: This title will display at the top of the section, so leave the field blank if the section does not need a title.
- Select a Background color (optional). Note: Use the drop-down selector to see what colors are available in your agency specific palette.
- The lightest background color in every palette is White.
- To remove the background color, click on the X on the right side of the selector. Note: This is the same as selecting White as the background color.
- If the Landing Page includes side navigation, all sections should have a white or no background color.
- Select a Background Image (optional) only if the selected layout is one full-width column. Note: This option is not available for any other layout option.
- Select an image from the system library. Once selected, indicate if you want the image to:
- Style as Superhero
- Toggle Transparency
- Select an image from the system library. Once selected, indicate if you want the image to:
- Read more (optional). Link that shows the content of the two items below when Read More text and URI have a value. Note: Make sure link text is descriptive to ensure accessibility.
- Add Text - works when "Read More Link" has a value.
- URI - start type in field to find the content you want to add.
- Click Add section.
- To edit the section title or background, click Configure Section to return to the options.
Instructional Visual Steps Below:
...


