Using & Updating Navigation Menus
- Chelsea Shadowens (Unlicensed)
- Donna Sumner
- Yen Tang
Updates
12/15/22 - Level 5 limit added to nesting
For end users to find your agency’s services and information quickly and easily, be mindful when organizing and labeling the navigational menu and sub-menus.
Your website has 2 menus:
Main menu - the main navigation bar across the center of your site
Footer menu - sits in the bottom of your site in the footer
For the best user experience, we recommend no more than 7 menu items at the top level of your Main menu. A short navigation bar is easier and faster for website visitors to read through. If they have to hunt through lots of options, they are less likely to find what they are looking for. This can generate more phone calls and emails to your office.
Adding a Menu Item
Content managers with the Editor role or Editorial Lead role are able to edit the menu.
There are two methods to adding a new item to the menu:
Add a Menu item on the Edit screen for the Content Item
When editing, there is an option in the right column called Menu Settings that are available in the following content types:
Bio
Book Page
FAQ
How Do I
Important Date
Landing Page
Listing Page
Program or Service
Topic Page
Webform
After expanding the Menu Settings section, check the Provide a menu link box to add the content item to the navigation.
This will reveal the menu settings options including:
Menu Link Title
Description
Parent Item
Weight
Add Menu link title (optional) - Enter a title. If left blank, the title of the content item will be used.
Add Description (optional) - Enter text that will appear when hovering over the menu item.
Parent item (required) - Select the navigational item that this content item will nest under.
If it will be a main navigational item, and not nest under anything else, you should leave it set to <Main Navigation> option.
Weight (optional) - Enter a number to determine the placement. Lower numbers will appear higher in the menu.
Add a Menu item to the Menu Structure
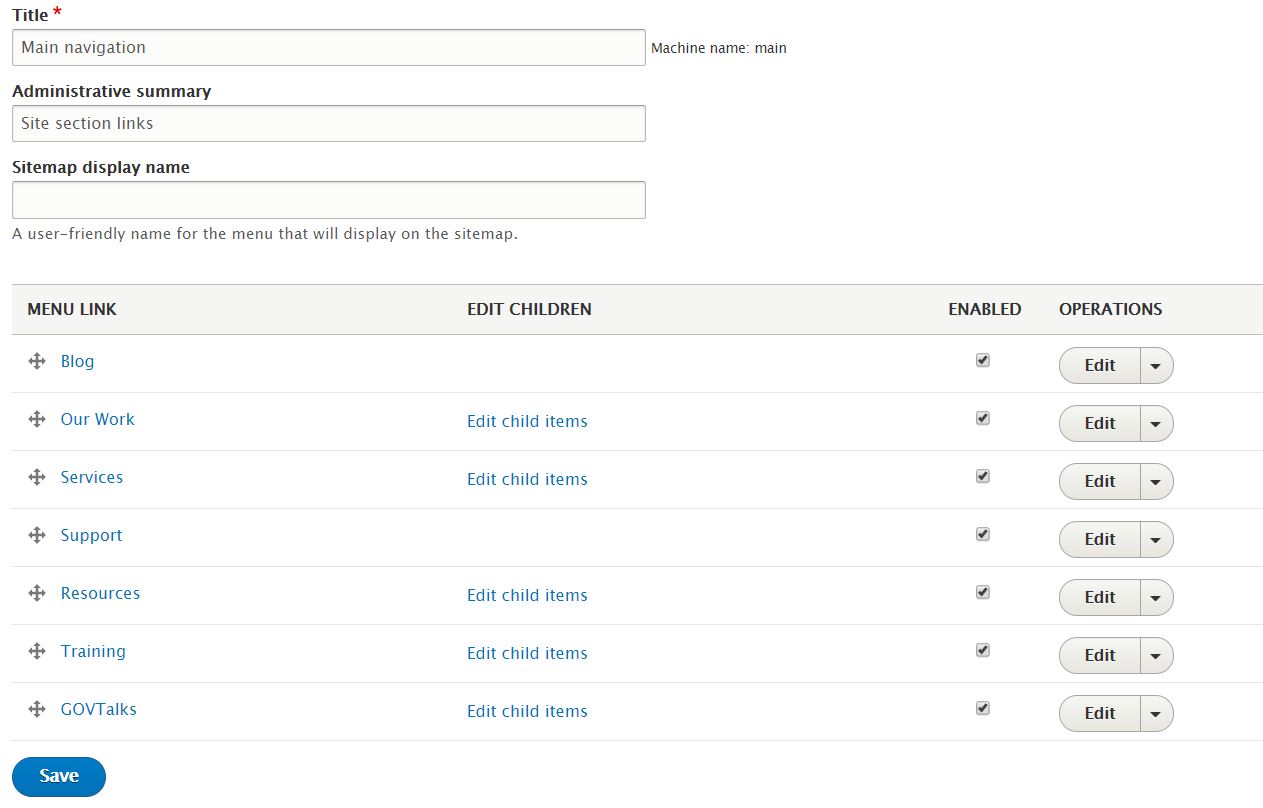
Click on Structure > Menus > Main Menu.
This brings you to your complete, main navigation.
Add Menu link title (required) - Enter the text that will appear in the menu.
Add Link (required) - Enter an internal node path or an external URL. For internal links, start typing the name of the content item and the field will auto-suggest items.
The Enabled box is checked by default so that the menu link appears. To hide the menu link, un-check this box.
Add Description (optional) - Enter text that will appear when hovering over the menu item.
Check the Show as expanded box to automatically show child menu items (if they exist).
Parent item (required) - Select the navigational item that this content item will nest under.
If it will be a main navigational item, and not nest under anything else, you should leave it set to <Main Navigation> option.
If no Parent is chosen, it will default to the main level navigation.
Hover over the handlebars next to the menu item you want to move and then nest it under the correct item.
Click Save.
Click Edit child items next to the menu item you nested it under and you should see it correctly under the right main menu item.
Use the handlebars again to move the item up and down in the menu.
Weight (optional) - Enter a number to determine the placement. Lower numbers will appear higher in the menu.
Click the Save button to add the menu link to the navigation.
Reordering Your Menu and Editing Child Items
The visible links under the Menu Link column are your main menu items.
Click on Structure > Menus > Main Menu.
To move the menu link higher or lower in the list, you can either:
Click and hold the + sign beside the menu link name. Drag and drop to the desired position.
Click Show row weights and change the number in the drop down down box. Lower numbers will appear higher in the menu.
Click the Save button.
To edit a menu item under one of the top level headings, you'll have to use the Edit Children function.
Click Edit child items next to the main menu item that hosts the menu item you want to edit.
This will bring up all of the menu items that sit under that heading.
Edit the item by clicking on the Edit button (under the Operations column) associated with that item.
From here, you can change:
the name of the menu item
the link
the parent item
If no Parent is chosen, it will default to the main level navigation.
Hover over the handlebars next to the menu item you want to move and then nest it under the correct item.
Click Save.
Click Edit child items next to the menu item you nested it under and you should see it correctly under the right main menu item.
Use the handlebars again to move the item up and down in the menu.
Click Save.
To get back to the main navigation top level, click on the Back to Main navigation top level link above the Menu Link column.

Removing a Menu Item
Click on Structure > Menus > Main Menu.
Click on the drop down menu under the Operations column and select Delete.
Click on the Delete button to confirm removal or click on the Cancel button to undo the deletion command.