Image
Chelsea Shadowens (Unlicensed)
Yen Tang
Martin Kester (Unlicensed)
Images are considered Media Items on the platform.
Adding a new Image
You can add an Image directly to a page by embedding it in the WYSIWYG editor or adding it to an image field, or you can add an image to the media library to access later.
File restrictions
There is a 5MB limit. Allowed file types are: PNG, GIF, JPG, JPEG
- Login to your agency website.
- Add the image to a page, a block, or the Media Library.
- Upload an Image directly in a text editor (WYSIWYG):
- Images can be embedded into the text editor, or "What You See Is What You Get" (WYSIWYG), field of certain Content Types.
- Select Edit for the page to which you'd like to add the image, or Create a new page.
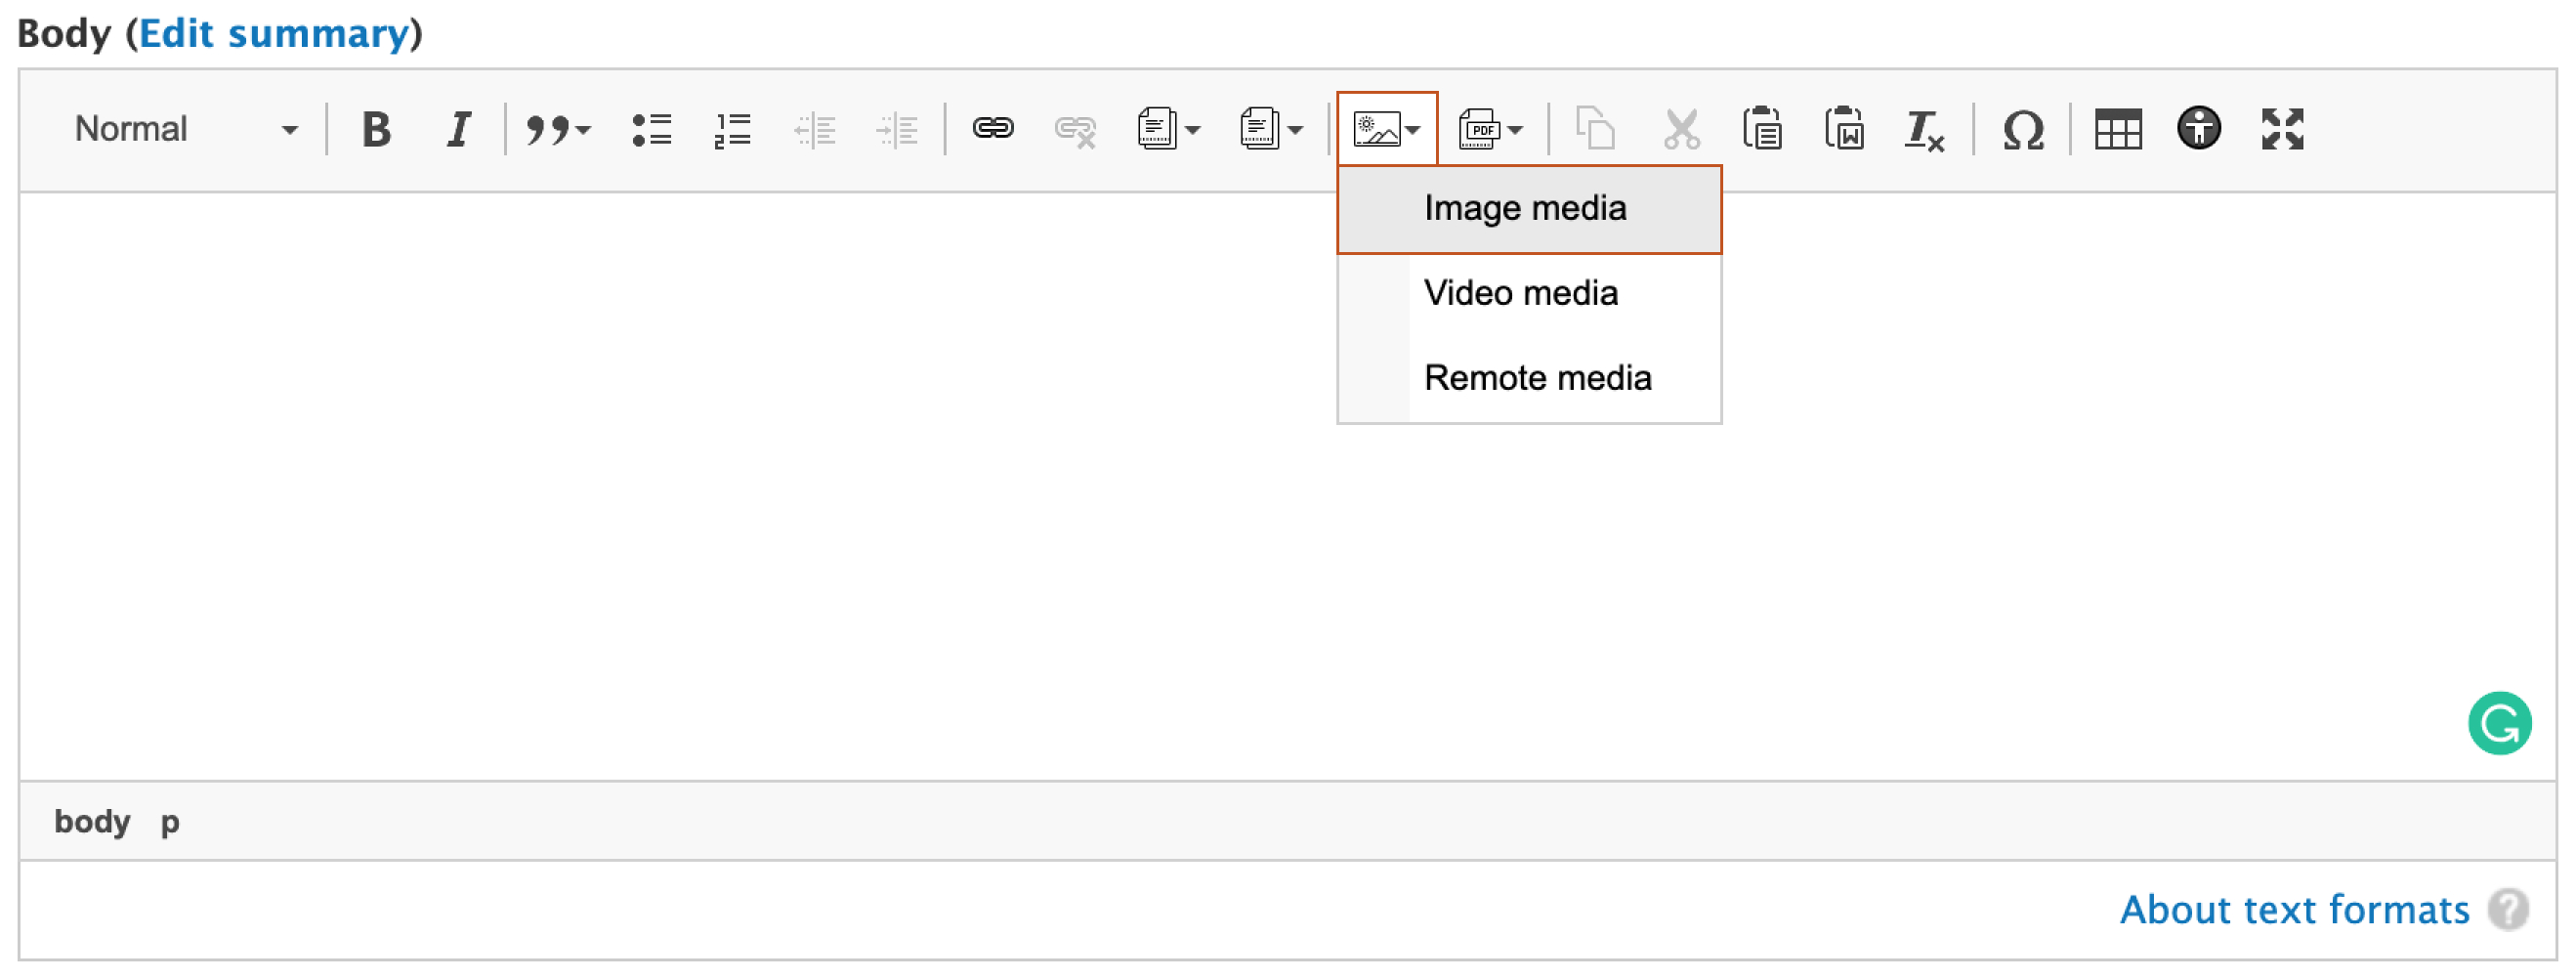
- In the WYSIWYG box, click the Embed Media icon and select Image media.
- Check the Image Library first to make sure the image you need is not already saved to your website.
- Click on Upload Image at the top of the selection screen.
- Either drag-and-drop or click Select files to upload an image from your computer.
- Upload an Image directly to an image field:
- Certain Content Types and Micro-Content Types have a field specifically for an image.
- Edit the node:
- If you want to add an image to a block on a Landing Page or Program or Service page:
- Select Layout for the page.
- Edit or create a block:
- To add a new block:
- Click + Add Block in the area you want to add the content.
- Use the menu on right side to select the content you want to add.
- To edit the contents of a block:
- Select the Edit Icon in the top-right corner of the block, which looks like a pencil.
- Click Configure.
- Click Edit.
- See our training on /wiki/spaces/KB/pages/628326414 for more.
- To add a new block:
- If you want to add an image to an image field on a Content Type (like a Teaser Image on News):
- Select Edit for the page.
- If you want to add an image to block embedded into the WYSIWYG of a page:
- Select Edit for the page.
- Locate the block in the WYSIWYG, indicated by a grey box with the title and type of block.
- Either double-click the box, or right-click and select "Edit BLOCK TYPE"
- In the pop-up window, click Edit.
- If you want to add an image to a block on a Landing Page or Program or Service page:
- Locate the image field.
- Click the Add Image button.
- Check the Image Library first to make sure the image you need is not already saved to your website.
- Click on Upload Image at the top of the selection screen.
- Either drag-and-drop or click Select files to upload an image from your computer.
- Add an Image to the Media Library to access later:
- Select Content from the toolbar at the top of the screen.
- Select the Media tab.
- Click the Add media button.
- Select Image.
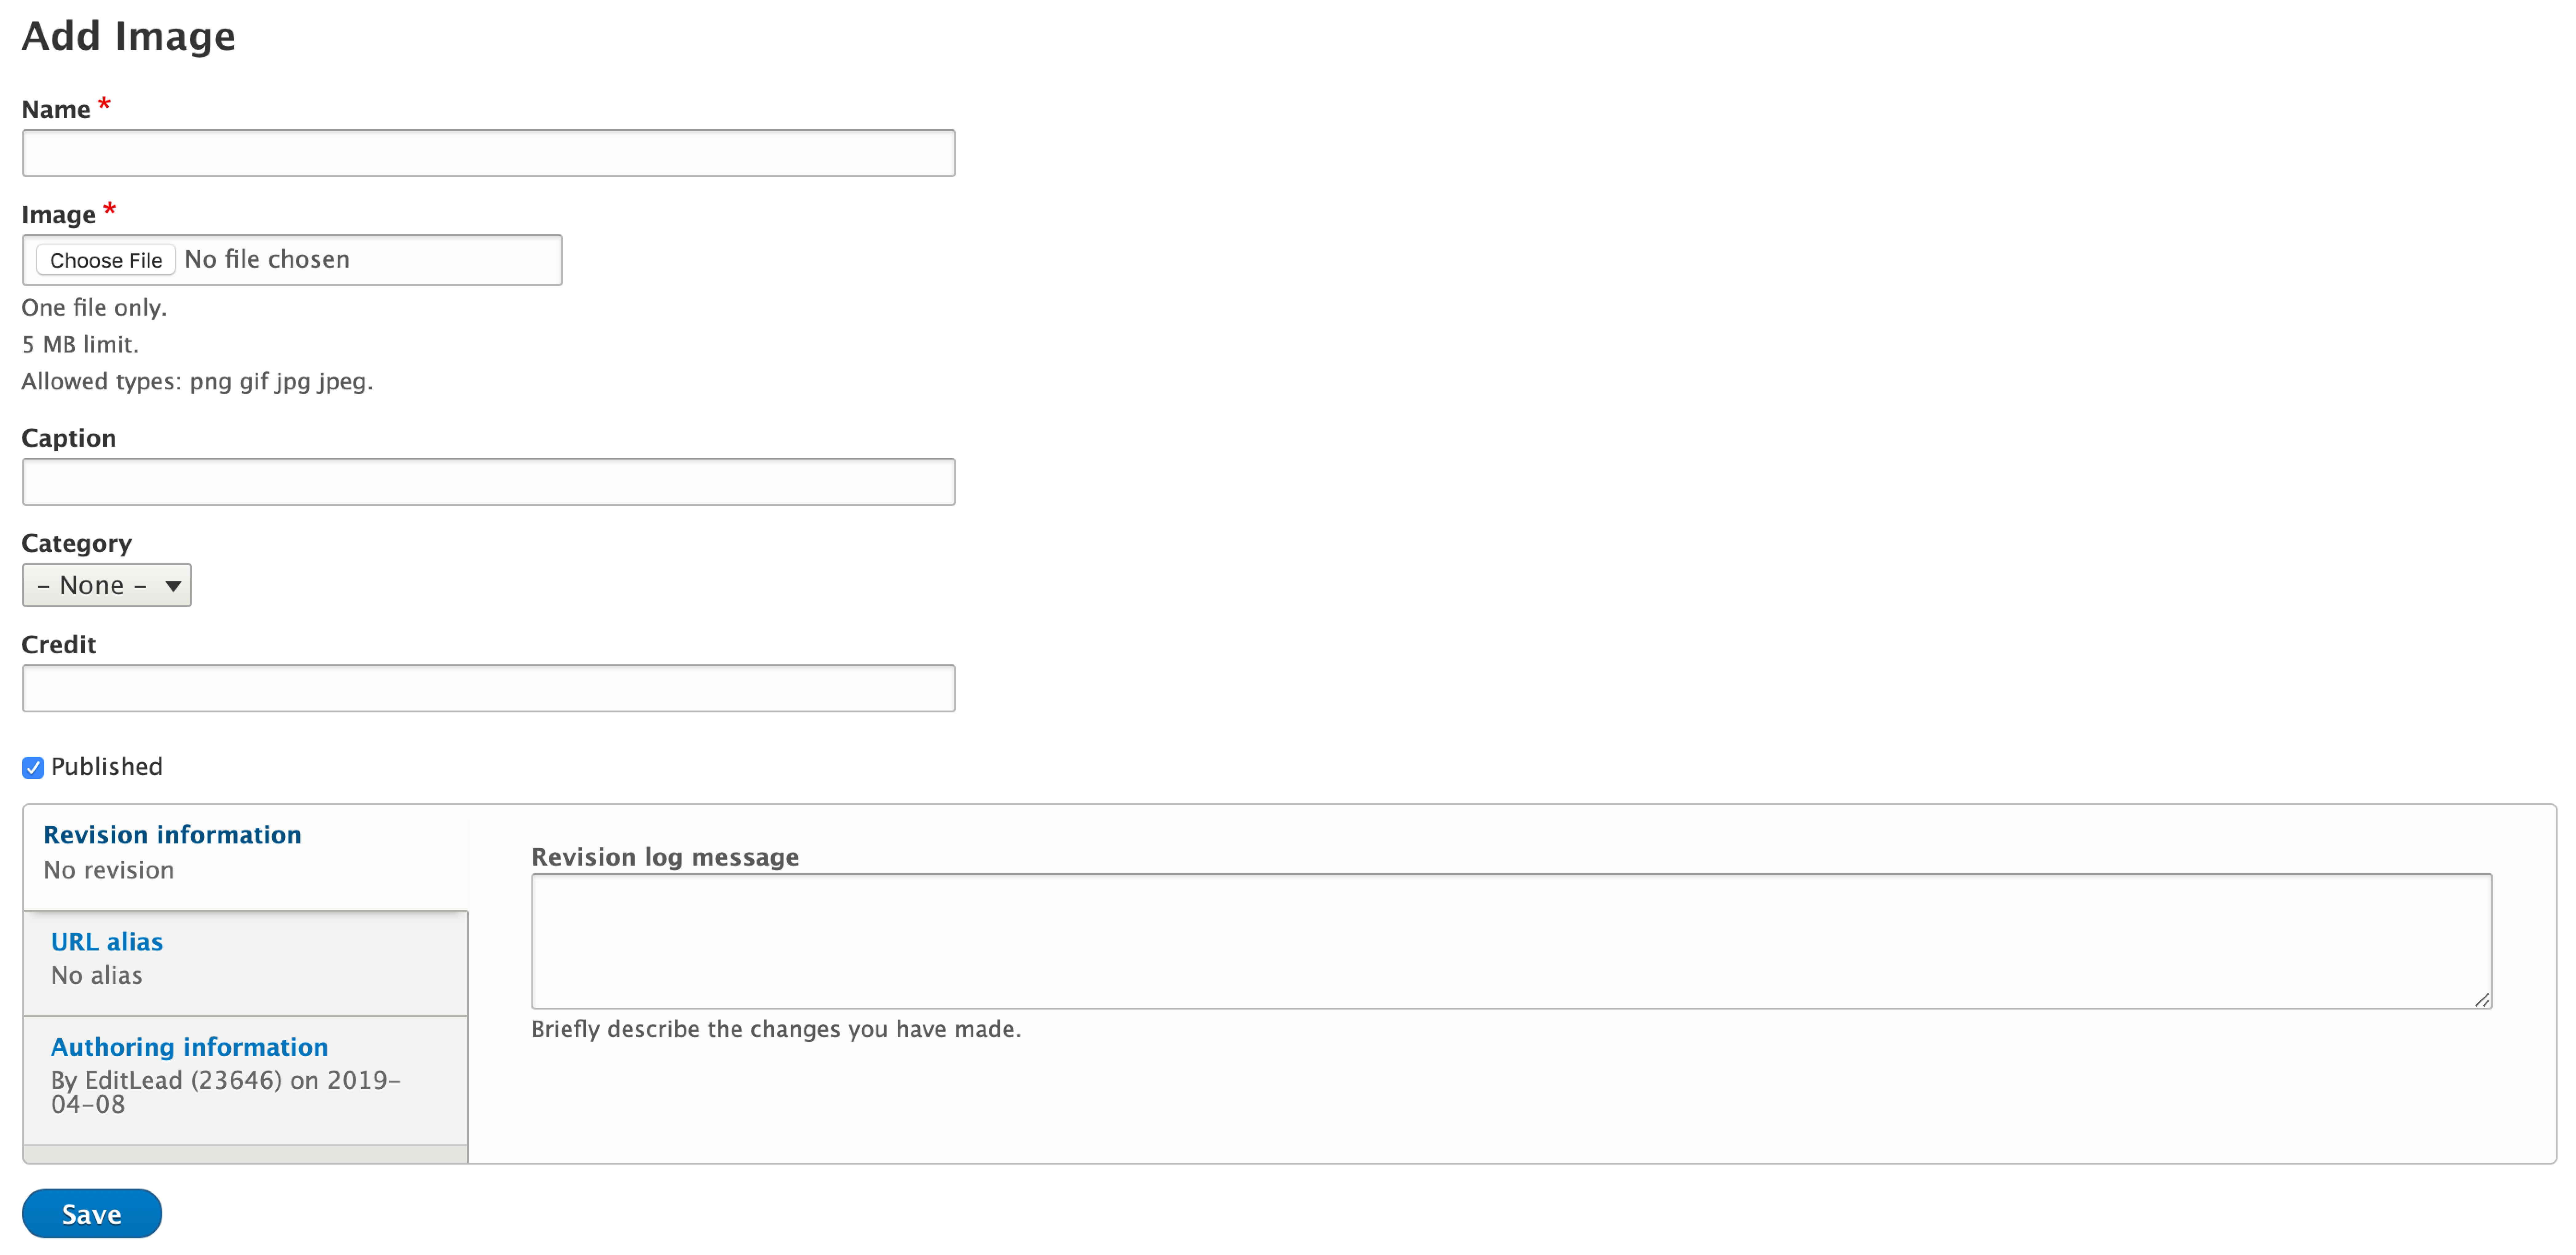
- Click Choose File and select the file you want to upload from your computer.
- Upload an Image directly in a text editor (WYSIWYG):
- Enter a Name for the Image so you can find it later (required).
- Add Alternative Text for the Image (required).
- This text should be a brief description of the image to be read aloud on screen readers for people with visual impairments.
- Add a Caption if needed.
- Select a Category to which you'd like to associate the image (optional).
- Add an Image Credit if needed.
- Click Save.
- If you uploaded directly in a WYSIWYG:
- Select the image alignment (Full-width, Left, or Right).
- Click the Embed button.
- If you uploaded directly to an image field:
- Make sure the the Published checkbox is checked, or the Moderation state is set to Published.
- Click Save.
- If you're editing a block embedded into the WYSIWYG of another page, the edit page will be open in a separate window from your previous window. Once your block edits are published, it will immediately update on the page, and you can close the extra window where you were editing the embedded block.
- If you uploaded to the Media Library:
- Make sure the the Published checkbox is checked, or the Moderation state is set to Published.
- Click Save.
- If you uploaded directly in a WYSIWYG:
- Your image is now available to be embedded in pages across your website.
Placing an existing Image
Once you've added an image to your website through any of the methods describe above, it is available for reuse anywhere else on the site. If, at any point, you edit the Image media item itself, all placements will update.
To add an existing image either to a WYSIWYG or to an image field, follow the same steps listed above, except:
- Instead of clicking "Upload Image," locate the image you want from the Image Library.
- If you know the name given to the image on upload to the site, you can filter the list to find it easier.
- Click the image thumbnail to select it.
- Click Select.
Edit or replace an Image throughout the entire site
If you want to edit or replace an Image across all placements on the site:
- Navigate to the Image in the Media Library by clicking Content in the Admin toolbar.
- Select the Media Tab.
- Find the Image you would like to delete in the list.
- Select Edit in the Operations column.
- Update any information: Name, Alternative text, Caption, Category, or Credit.
- To replace the image itself in all placements across the entire site:
- Click the Remove button under the Alternative text field.
- Follow the steps above for adding a new image through the Media Library.
Remove an Image from a page
If you want to remove an Image from a certain page without deleting it from the entire site:
- To remove the image from a WYSIWYG editor:
- Navigate to the page housing the Image.
- Select Edit.
- Scroll down to the WYSIWYG editor and highlight the Image placeholder.
- Hit Delete on your keyboard.
- Publish the page.
- To remove the image from an image field:
- Edit the node:
- On a Landing Page or Program or Service page:
- Select Layout for the page.
- Select the Edit Icon in the top-right corner of the block, which looks like a pencil.
- Click Configure.
- Click Edit.
- On a Content Type:
- Select Edit for the page.
- In a block embedded into the WYSIWYG of a page:
- Select Edit for the page.
- Locate the block in the WYSIWYG, indicated by a grey box with the title and type of block.
- Either double-click the box, or right-click and select "Edit BLOCK TYPE"
- In the pop-up window, click Edit.
- On a Landing Page or Program or Service page:
- Click Remove under the image preview.
- Make sure the the Published checkbox is checked, or the Moderation state is set to Published.
- Click Save.
- Edit the node:
Remove the Image from the entire site
If you want to remove an Image from the site entirely:
- Navigate to the Image in the Media Library by clicking Content in the Admin toolbar.
- Select the Media Tab.
- Find the Image you would like to delete in the list.
- Select the drop-down in the Edit button in the Operations column.
- Select Move to Trash.
- Note: If the image is being used on any pages or blocks, it will be listed in a table on the confirmation page. Check this table to be sure that you're aware of all pages and blocks that will be impacted by deleting this Image. If you do not want to delete the image, select Cancel.
- Move to Trash if you're sure that you want to move the item to the Media Trash.
Once the item is in the Media Trash, public users will no longer see the Image in any of its previous placements on the site.

